Introduction to Phaser
The Dungeon Generator creates perfecrtly logical maps. You could witness the perfection in the console by using Dungeon.print(). But, really… we can’t have a game on the console right?
That’s where Phaser comes in. Phaser is an HTML5 game enigine that’s based on webGL, with a neat fallback to HTML5 Canavs. It is super lightweight and mobile platform oriented. The best part? The massive store of documentation and examples. And, there a whole load of tutorials out there that would help a noob like me figure out how things are done. This was the first Phaser tutorial I took. You should really check out the examples to see what Phaser is capable of.
Source for this part is the same as last time.
SOURCE
Dungeon Time
The map would have 32x32 tiles and hence, MAP_SIZE has been set to 32. We call our fancy Dungeon object that we had made last time. It prints the dungeon array onto the console.
var MAP_SIZE = 32;
Dungeon.generate(MAP_SIZE);
Dungeon.print();
var map = Dungeon.getMap();
var rooms = Dungeon.getRooms();
var tree = Dungeon.getTree();
Set Phaser on Stun
The index.html sets the playing field for Phaser.
<div style="margin-left:64px;" id="phaserCanvas"></div>We kickstart Phaser in the main.js.
var game = new Phaser.Game(640, 384, Phaser.AUTO, 'phaserCanvas', {
    preload: preload,
    create: create,
    update: update,
    render: render
});

function preload() {
}

function create() {
}

function update() {
}

function render() {
}
This will set the Phaser canvas to 640x384 pixels and renders it on the div phaserCanvas. These functions - preload(), create(), update() and render() form Game Loop. You preload the assets such as images and music, you then create all game objects such as the background, player and enemies. At every iteration of the Game Loop, you update the game objects, say, player movement or enemy logic. Finally you render the extra game objects onto the canvas, after Phaser is done drawing everything. Like this.
An awesome feature about Phaser is that it completely handles the rendering part. The game objects such as player sprite or background tiles are rendered on each iteration in the order in which they were created. Hence, the render() function serves to augment the canvas with objects that we hadn’t already created during the create() call. Neat, huh?
Load before firing
We fill up the preload() with relevant assets that we’d want to load.
function preload() {
    game.load.image('wall', '../../assets/wall.png');
    game.load.image('floor', '../../assets/floor.png');
    game.load.image('corridor', '../../assets/corridor.png');
    game.load.spritesheet('button', '../../assets/flixel-button.png', 80, 20);
}
The Phaser.Loader class functions are used to add the assets to the cache. The wall, floor and corridor tiles are simply flat colored 12x12 pixel sprites. I stole the flixel-button sprite from the Phaser examples.
Let there be Tiles
create() is where all the magic happens. Game objects are brought to life and given starting properties.
To draw our dungeon, I have used a Phaser.tilemap object. This comes with a lot of cool functions that I would otherwise have to write myself, if I had simply used regular Sprite objects.
    //  Creates a blank tilemap
    gmap = game.add.tilemap();

    //  Add a Tileset image to the map
    gmap.addTilesetImage('wall','wall',12,12,null,null,0);
    gmap.addTilesetImage('floor','floor',12,12,null,null,1);
    gmap.addTilesetImage('corridor','corridor',12,12,null,null,2);
Once gmap is created we assign the assets that we had preloaded to it. Look at Phaser.Tilemap.addTilesetImage:
addTilesetImage(tileset, key, tileWidth, tileHeight, tileMargin, tileSpacing, gid)Since I am using individual tile sprites, rather than a sprite sheet, I need to manually assign the gid. Else, the gid gets reset and reconfigured each time. Using 0, 1 and 2 for wall, grass and corridor works default with out Dungeon.map.
The tilemap object, gmap is a logic object. We still need a Phaser.TilemapLayer which would be the graphic representation of the tilemap. A tilemap can have multiple layers, and we can assign unique tiles to any layer. In our case, we just need one.
    //  Creates a new blank layer and sets the map dimensions.
    layer0 = gmap.create('layer0',MAP_SIZE,MAP_SIZE,12,12);
    layer0.resizeWorld();

    stats = Dungeon.getStats();
    for (var i=0; i<MAP_SIZE; i++) {
        for(var j=0; j<MAP_SIZE; j++) {
            gmap.putTile(map[i][j],i,j,layer0);
        }
    }
And now, the fun part. We finally assign our map to the tilemap on the appropriate layer. Here’s what Phaser.putTile takes:
putTile(tile, x, y, layer)Where, the first argument is the tile key that we had assigned during the addTilesetImage calls. Since, the map holds values 0,1 or 2, it fits along with keys that we had assigned. The x,y indicates the tile position in tile units (not pixels). The last argument adds our tile to our only layer.
I kinda just picked up the code by going over this Blank Tilemap example and the tilemap docs, and a bit of trial and error.
The last part is creating the buttons that would re-generate the map and toggle displaying the Boxes. Once, again Phaser’s Button Example gave me all that I needed. We also need a handle to the graphics object to draw the Boxes. Here’s the Phaser Display Graphics example. The buttons, when clicked on will call genMap() and toggleBox()
    game.add.button( 400, 256, 'button', genMap,this, 0, 1, 2);
    game.add.button( 400, 300, 'button', toggleBox,this, 0, 1, 2);
    marker = game.add.graphics();
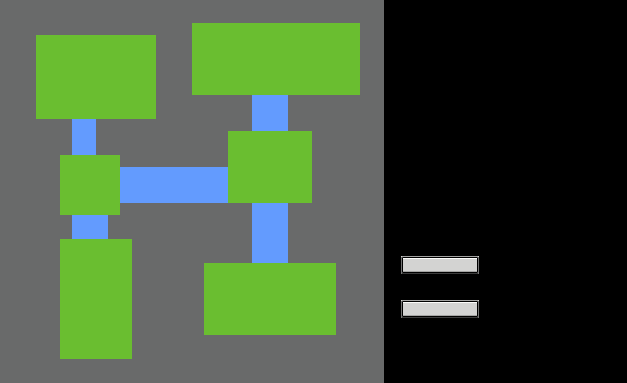
If you run the game even with empty update() and render() functions, you’d see this:
That’s just how awesome and simple Phaser is. All you had to do was load a few assets and assign them to game objects, and lo, Phaser handles the rest.
Drawing Words
Honestly at this point, just with the preload() and create() functions, we are all set. The map would render onto the screen using the tile sprites we assigned. But, if I wanted to re-generate the map I would have no choice but to reload the page. That’s why we had added those buttons.
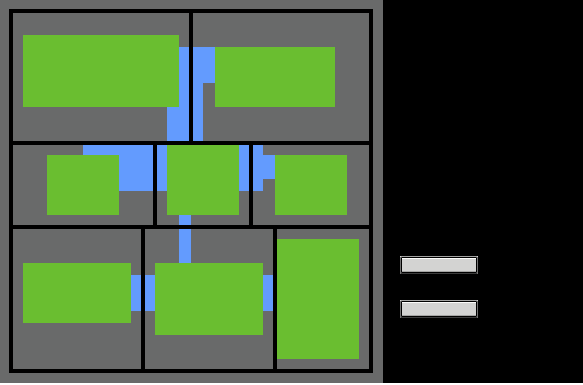
genMap() repopulates the map array with a newly generated dungeon and reassigns the tiles on tilemap object. toggleBox() toggles a logic variable that records whether the Boxes need to be drawn or not and calls drawBox(). The tree object has the information for the boxes, yes? So, we drawRect with those dimensions using the Phaser graphics object, marker.
function genMap() {
    console.clear();
    Dungeon.generate(MAP_SIZE);
    // Dungeon.print();
    map = Dungeon.getMap();
    stats = Dungeon.getStats();
    rooms = Dungeon.getRooms();

    for (var i=0; i<MAP_SIZE; i++) {
        for(var j=0; j<MAP_SIZE; j++) {
            gmap.putTile(map[i][j],i,j,layer0);
        }
    }

    drawBox();
}

function toggleBox() {
    state_toggleBox = state_toggleBox? 0: 1 ;
    drawBox();
}

function drawBox() {
    if(state_toggleBox){
        marker.clear();
        marker.lineStyle(4, 0x000000, 1);

        tree = Dungeon.getTree();
        for (var node in tree) {
            var t = tree[node];
            marker.drawRect(t.x*12, t.y*12, t.w*12, t.h*12);
        }
    } else {
        marker.clear();
    }
}
As a last feature, I wanted to display the sizes of each room at the center of the room. Used Phaser.debug.text. All of these instructions would go into the render() command. The stats would be drawn in the corner and button text would be drawn over the buttons.
function render() {
    game.debug.text("gen", 400+16, 256+12,'#F00');
    game.debug.text("box: "+state_toggleBox, 400+5, 300+14, '#000');

    var i=0;
    for (var key in stats) {
        game.debug.text(key+": "+stats[key], 400, 48+(i*16));
        i++;
    }

    for (var i=0; i<rooms.length; i++) {
        var r = rooms[i];
        game.debug.text(r.w+"x"+r.h, r.center.x*12, r.center.y*12);
    }
}
Adding simple text gave more depth to the whole thing. We are now Done!


No comments:
Post a Comment
You got something to say? Wait! I need to get my microphone array online.